

New year, new goals, new excitement to get more of my projects up on the blog!
The fall and beginning of winter was a busy time for me. It always is, so I don't know why I'm surprised every year with how much I need to get accomplished. When you are an artist and sell your wares, the season leading up to Christmas is always going to be the busiest time. But every year I think I can somehow manage it all and make it seem less. It just doesn't work that way, not for me anyway.
In the midst of all the jewelry designing and getting ready for shows, I also want to make things for my home. It's so easy to get inspired by all the beauty on Instagram and Pinterest, especially around the holidays. So this time, in mid December, I decided I was going to try something I had pinned awhile ago. It was this fabulous canvas of white dots on gold. It looked pretty easy so I decided I could pull it off before Christmas to use on my mantel. All credit goes to this blogger who tried it as a Pinterest challenge awhile back. I loved how she shared her process. It was the depth of color UNDER the gold that really appealed to me. Here's how it went for me:
First I bought a 24 x 36 inch canvas {with a 40% off coupon at Michael's I think}, so this DIY is affordable! In fact, the expensive part was the package of 1 inch stickers at an office supply store. I used Avery Mailing Seals {No. 5247}. They come in a pack of 600 labels. I used 255 stickers.

I applied the one inch stickers to the middle of the canvas first.

I placed the stickers sparingly as I got away from the 'solid' center.
This was of course a learn as you go experience. I wish now that I had spread the dots out a bit more next to the center. I would have liked to have had more dot definition along the edge of the solid white center. You'll see what I mean when the stickers are removed.
After I placed the stickers, including placing some on the sides of the canvas, I painted the entire canvas red. The white center was solid stickers so there was really no need to paint that part.

Tompte Red - Ceramcoat by Delta
After the red layer dried I applied dark blue! The reasoning behind these undercoats was for depth of color. In the original blog post that I was using as my instruction, she hadn't intended to end up with a gold canvas. She started with dark blue and added colors. After she removed the dots she was dissatisfied and ended up painting a layer of gold! I could have just started with the gold but I loved how the edges of the circles looked with some color showing. I may even try this again sometime and paint blue over some stickers BEFORE the red!

Ultra Blue Deep - Americana

The painting process was very fast and easy. You can see that my brush strokes were all over the place. I did two coats of the gold, allowing a little drying time between coats.


I used 1 1/2 bottles of paint - Glorious Gold - Americana Gloss Enamels Metallic
The original instructions didn't indicate how long I should let the paint dry before I started removing the stickers. I went with my gut and started removing the stickers pretty quickly. My thought was that with 3-4 layers of paint I didn't want the paint to peel back along with the stickers. My gut was correct. I had to be careful when I pulled off the stickers so that the paint didn't peel back.

I used a toothpick to carefully pry the stickers off.

I really like the final result. I love the texture of the brushstrokes. I liked it enough to use it for my Christmas mantel AND built my winter mantel around it too!


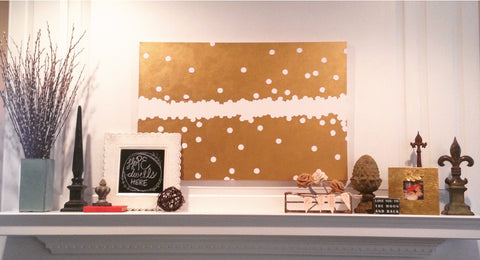
and that sweet chalkboard art? SUPER easy idea I thought up after Christmas.
I purchased a plate charger from Pier 1 Imports for $16.99. I painted the center square with chalkboard paint, about three coats.

and... Voila!

Welcome 2015!